Integrate PartCover.Net and Cruise Control.Net
Published on Jun 11, 2008A few months ago I mentioned that I was using PartCover.Net to measure test coverage in my projects. I have been really busy but I decided that this week I was going to integrate the reports with CC.Net.
Cruise Control ships with NCover support out of the box but it’s also very easy to integrate other reports as far as they are in xml format and you know (or have) an xml stylesheet to generate html from the report.
Partcover comes with two xslt files one to report results by assembly and a second one to report results by class. To use this files in CC.Net you need to make a minor change on them or they won’t work.
Let start with the class.report.xslt file. Open the file using your favorite text editor (PSPad anybody?) and look for this line:
Change it to:
Notice the double back slash, this change is needed because the way of CC.Net works is merging all the reports for all your tool together in a big xml file, so at that moment PartCoverReport is not the root element but a child element of the merged xml file.
Open the Assembly.report.xslt file and add the “extra” back slash in any mention to /PartCoverReport as well.
Configuring CC.Net
Copy the modified xslt files into the stylesheets folder of your webdashboard install, usually CruiseControl.Net\webdashboard\xsl\, I like to change the name of the files to indicate what report they affect, in this case I named PartCover.assembly.report.xsl and PartCover.class.report.xsl (notice that I droped the “t” from the file extension, I don’t thing this is important, but all the files in this folder have an xsl extension, this way I keep things consistent).
Now we need to configure the reports plug ins, open dashboard.config usually at CruiseControl.Net\webdashborad and under
You need to enter:
This will add a summary on the build report page. Then under
Enter:
This will add a link on the right navigation bar to see the details of the report for this build.You need to restart IIS for CC.Net to pick up the changes.
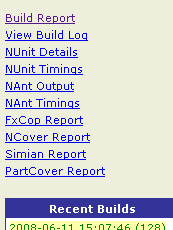
You will see a menu item to the PartCover report on the side.
Clicking on the link you will see a simple report like this:
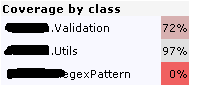
(I had to hide the name of the company) but you will see the qualified name for the class.
Running PartCover.Net from Nant
I decided to Run PartCover from Nant using and exec task. This is an example:
${projectName} is the property where I store the name of my project. ${projectTest} is the property where I store the name of the project that has all the unit test. ${buildPath} is the property where I store the build folder.
Let me explain each argument:
—target is the Path to your nunit-console.exe
—target-work-dir is the Path to the folder where the dll(s) that contains the test resides.
—target-args is the name of the dll
—include is used to indicate witch namespaces and classes to include in the report, in this cases I’m saying any class under the LaTrompa namespace
—output is where I want to save my report, this is the complete path with the name of the file.
There is another argument that is very useful
—exclude is used to ignore some classes or namespaces from the report.
Adding the report to the build
Now you need to configure your project in CC.Net to merge the report generated by PartCover.To do this, inside the project tag in your ccnet.config file lock for the publishers tag and add a new file under
After doing this you can run a build for the project and your PartCover results will be added.
Next steps
I will try in a future post to modify the xsl to have more data, make it look nicer and integrate a bit more with the general look and feel of the CC.Net dashboard.I think that I will be able to provide detailed information per class and method and I will also see how can I modify the Dojo based statistics plugin to include this data.