Building a basic iOS UI using Angular and Ionic (Part 2).
Published on Feb 28, 2014Other articles in the Ionic series.
- Building an iOS app with PhoneGap, Angular.js and the ionic framework (Part 1).
- Recording Geo location data with PhoneGap and Angular (Part 3).
- Refactoring the js code structure PhoneGap and Angular (Part 4).
- Uploading files with PhoneGap and Angular (Part 5).
- A few different ways to improve user feedback in our Ionic application (Part 6).
- Displaying current and max speed with PhoneGap and Ionic (Part 7).
- Deleting files with PhoneGap (Part 8).
- Calculating distance and speed with the GeoLocation API - PhoneGap (Part 9).
Code for this series is available on [Github](https://github.com/hgarcia/dynamic-sports)
We will install a few more things that we will need to start building our application and create a basic hello world that we will deploy to our emulator.
Installing some plugins for PhoneGap.
The first thing to do is to install the platform we want to run our code on.
ionic platform add ios
You need to have the ios-sim node packaged installed. You should be fine if you follow the instructions in the previous article.
We will also install a pair of plugins; the device plugin is used by ionic to check device capabilities. We will also install the console plugin so we can use console.log in our code while running code in the emulator.
    cordova plugin add org.apache.cordova.device
    cordova plugin add org.apache.cordova.console
Building and launching the application for the first time.
Ionic has three commands that we can use to build the application.
The build, the emulate and the run command, they both take the platform that you want to build you application for.
The build command will only build the code, for example in ios it will create an Xcode project inside the platforms/ios folder and also build the project under a build folder inside the platforms/ios.
The emulate command will try to run application into a simulator after building it.
The run command will try to run the project on a connected devie.
We will create a script command on the package.json file to save a few keystrokes to run the emulate command since we will be running it quit often.
Open the package.json file and modify the scripts section to look like this.
    "scripts": {
      "test": "node_modules/karma/bin/karma start tests/karma.config.js",
      "ios": "ionic emulate ios"
    }
Now we can run the command by typing.
npm run ios
It doesn’t look like much but since we will be running it again and again it will save us time.
Creating the home page and some basic navigation.
We will start with a super basic hello world page, pretty much the same as in the ionic documentation for now.
In the index.html page at the root of the www folder we will add the following markup.
  <!DOCTYPE html>
  <html>
    <head>
      <meta charset="utf-8">
      <meta name="viewport" content="initial-scale=1, maximum-scale=1, user-scalable=no, width=device-width">
      <title>Dynamic Sports</title>

      <!-- IF using Sass (run gulp sass first), then uncomment below and remove the CSS includes above -->
      <link href="css/ionic.app.css" rel="stylesheet">

      <!-- ionic/angularjs js -->
      <script src="lib/ionic/js/ionic.bundle.js"></script>

      <!-- cordova script (this will be a 404 during development) -->
      <script src="cordova.js"></script>

      <!-- your app's js -->
      <script src="js/app.js"></script>
      <script src="js/controllers.js"></script>
      <script src="js/services.js"></script>
    </head>
    <body ng-app="dynamic-sports" animation="slide-left-right-ios7">
      <!--
        The nav bar that will be updated as we navigate between views.
      -->
      <ion-nav-bar class="bar-stable nav-title-slide-ios7">
        <ion-nav-back-button class="button-icon icon ion-chevron-left">
          Back
        </ion-nav-back-button>
      </ion-nav-bar>
      <!--
        The views will be rendered in the <ion-nav-view> directive below
        Templates are in the /templates folder (but you could also
        have templates inline in this html file if you'd like).
      -->
      <ion-nav-view></ion-nav-view>
    </body>
  </html>
The body includes the ng-app attribute that creates an angular application. We are using two directives included on ionic.
The ion-nav-bar and the ion-nav-view.
The ion-nav-bar directive is highly configurable and will provide our application with a native like navigation if used properly.
Both directives can take an animation attribute that accepts multiple values, we will be using the default values for now.
We are using sass, so we will need to run gulp before every build (or set it up to watch). Since we are running an npm command to launch the application in the emulator we can modify that command to add the gulp build step.
"ios": "gulp sass && ionic emulate ios"
We need to setup the navigation states, a controller and a template for the home page.
We will create two files inside the www/js folder. app.js and controllers.js.
Open the app.js file and enter this code.
  /* globals angular */
  angular
    .module('dynamic-sports', ['ionic', 'dynamic-sports.services', 'dynamic-sports.controllers'])
    .run(function($ionicPlatform) {
      $ionicPlatform.ready(function() {
        if(window.StatusBar) {
          // org.apache.cordova.statusbar required
          StatusBar.styleDefault();
        }
      });
    })
    .config(['$stateProvider', '$urlRouterProvider', function ($stateProvider, $urlRouterProvider) {
      'use strict';
      $stateProvider
        .state('home', {
          url: '/home',
          templateUrl: 'templates/home.html',
          controller: 'HomeCtrl'
        });

      $urlRouterProvider.otherwise('/home');
    }]);
Now we will add the controllers code for the controllers.js file.
  /* globals angular, console */
  angular.module('dynamic-sports.controllers', [])
    .controller('HomeCtrl', ['$scope', function ($scope) {
      'use strict';
      console.log('HomeCtrl');
    }]);
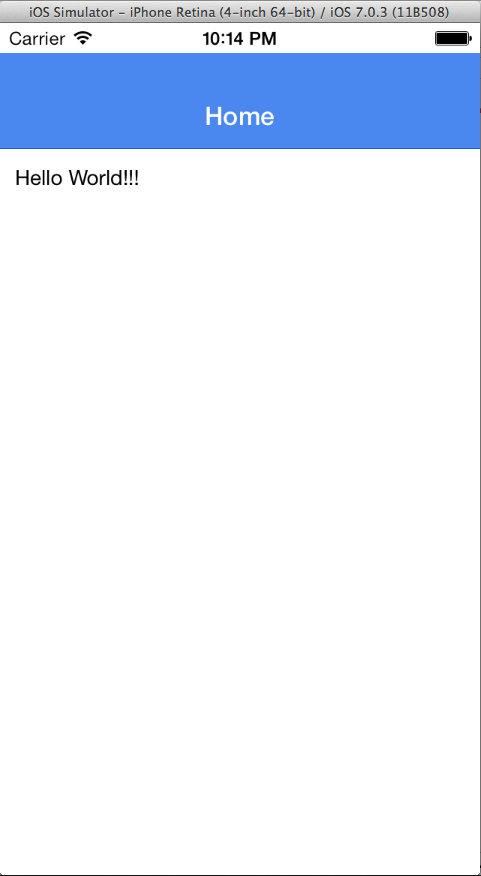
Finally we will create a home.html file inside the www/templates folder with the following code.
  <ion-view title="'Home'">
    <ion-content has-header="true" padding="true">
      Hello World!!!
    </ion-content>
  </ion-view>
We can check it out using the ios emulator. We will run the npm command we set up before npm run ios
If you are not seeing the app or the styles look weird, make sure that the Angular module, and the ng-app in the index have exactly the same name.
Next steps.
We will start writing tests and we will change the architecture into something more structured while implementing some of the real features for our app.